Outlook offers its users features that enable email communication quick and efficient. MS Outlook is used by large number of professionals and while working on office tasks individuals require to send emails and reports. Before sending emails, it is necessary that the content is up to the mark and there are no spelling and grammar mistakes. While Outlook has the tool to correct these mistakes, sometimes it fails to work out. In brief ‘Spelling and Grammar check is not working’. Most of the professionals ask question ‘Spelling and Grammar check is present in which tab’ and how to resolve the error? Then this article will help out.
You can manually check for the spellings, but if you are confused about a single letter, the Spelling and Grammar Checker in Outlook help out without going to any new window. It matches the sentences and looks for spelling mistakes. Users can view the option with Spelling and Grammar Key shortcut if they are unable to find in Outlook. So, check out the steps to enable Spelling and Grammar checker in Outlook 2016/ 2013/ 2010 and 2007
Manually Check for Spelling and Grammar Mistake in Outlook
For those who do know the tab in which Spelling and Grammar check option is available can get it by following steps

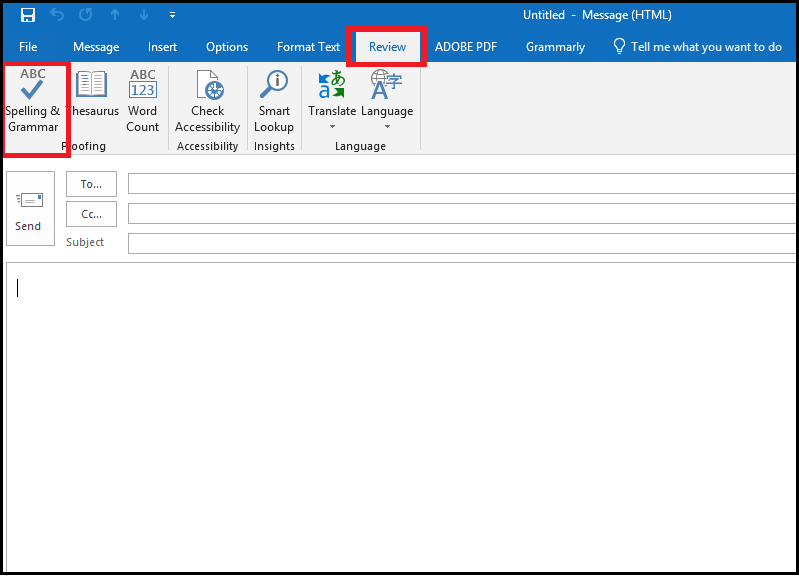
- When you have composed the message then go to Outlook navigation bar (blue strip)
- Now click on the ‘Review’ tab and ‘Spelling and Grammar’ option will appear
- Select the option and it will look for any spelling or grammar mistakes in the message body
A quick way is to initiate the process is with Spelling and Grammar short cut key i.e. F7, when the message is composed just press F7 key on the keyboard and spell checker will start.
Set Automatic Spell Check
Manually checking spelling and grammar mistakes affects the productivity as the time gets wasted in spell check, rather than actual work. Users can set the automatic process, which will check the message for spelling/ grammar errors before sending emails.

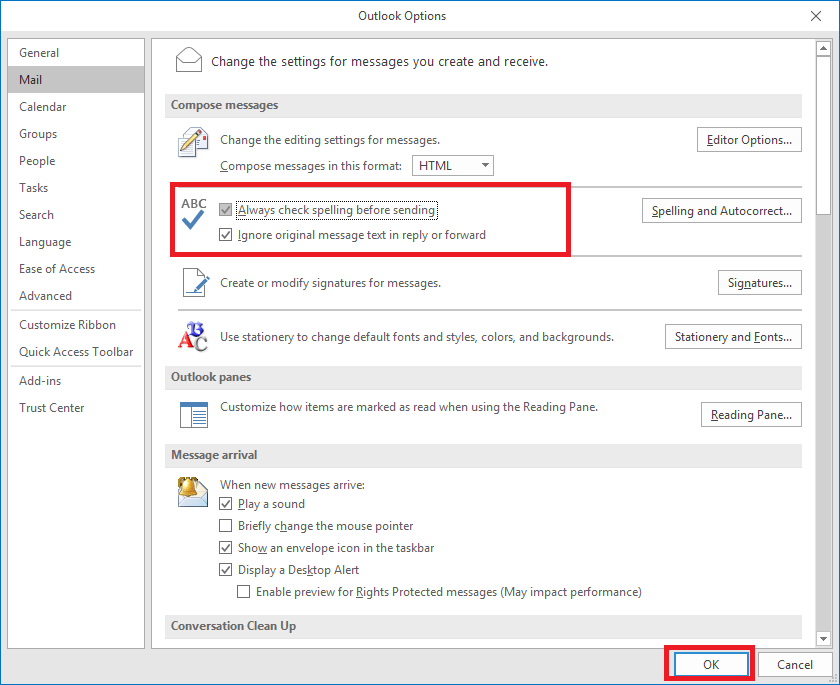
- Open Outlook and then click on File
- Now go to Options>>Mail and then go to ‘Compose Message’ section
- Checkmark the option ‘Always check spelling before sending’
- Click on OK to save changes
Enable Spell Check in Outlook 2007
The interface of Outlook 2007 is different from that of 2016/ 2013 and 2010 so, to enable Outlook 2007 spell check follow the given steps
- Open Outlook and go to Tools and then Options
- Now click on the spelling tab in the new window that opens
- Select ‘Always Check Spelling before Sending’
Apart from the File menu, there is another option to check spelling mistakes as per the Language selected.
Spell Check on Language Selected in Outlook 2016/ 2013/ 2010

- Open MS Outlook and then click on New Mail
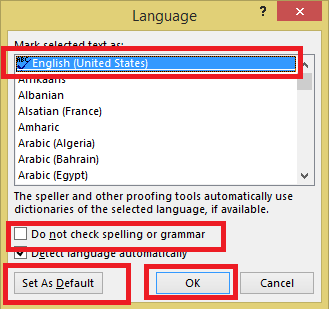
- Click on Review tab>>Language and then select Set Proofing Language
- Go to ‘Do not check spelling or grammar’ option and uncheck it
- Click on ‘Set as Default’ button and then OK
For MS Outlook 2007
- Click on New then Select Mail Message
- Now go to Home tab >> Proofing group
- Click on Spelling then set the language
- Select ‘Do not check spelling or grammar’ >> click Default button
- Try to send a new mail, the spell check will work.
These are the two methods by which you can enable spelling and grammar check option in Outlook 2016/ 2013/ 2010 and 2007.
