Introduction
The majority of SQL database users are not aware of the structure that how a database works. They save their data in it and retrieve it whenever required. That’s why when the SQL Server shows an error, then they cannot recover the tables saved in the database. A SQL database contains several objects like tables, indexes, triggers, procedures, and views. The logical collection of all these objects is called a SQL schema and corruption in any object may disrupt such schema.
The main job responsibility of the Database Administrator is to protect the schema from various attacks and check for the database’s health routinely.
Common causes of SQL Database corruption
SQL creates the database in two formats – MDF (Master Database File) and NDF (Not Master Database File). There can be a variety of reasons that affect both of these databases and show multiple errors as presented below-
“The header for file ‘DatabaseName’ is not a valid database file header. The FILE SIZE property is incorrect.”
SQL Fatal Error – 823.
“The Operating System returned error 117 to SQL Server at offset.”
SQL Error – 8946.
“Allocation Page (Page ID) has invalid PAGE_TYPE page header values.”
These are some common SQL server errors that show the problems directly related to the bad schema or corruption in the database. Some common reasons behind such errors are-
- Abrupt Shutdown of Server.
- Abrupt shut down of the user computer.
- Presence of bugs in outdated SQL Server.
- Unexpected changes in the SQL account.
- Corruption in the File header.
- Malware corruption.
- Ransomware attack.
Generally, SQL Server shows such above-mentioned errors whenever it detects some bad elements in the system, but many times it does not show some visible error messages. The Administrator has to check for the integrity of the database (both physical and logical) of the entire dataset. There are various methods to check for database corruption in SQL Server and you can examine them based on the behavior of SQL Server.
Method-1. Run the DBCC CHECKDB command.
The CHECKDB command is the first step in starting the database repair process as it brings out the irregularities in the database schema.
DBCC CHECKDB <Database Name>
It will run a scan in the selected database and bring out a detailed description of all the errors, issues, and corruption in the affected object.
Method-2. Set Page Verify option with CHECKSUM.
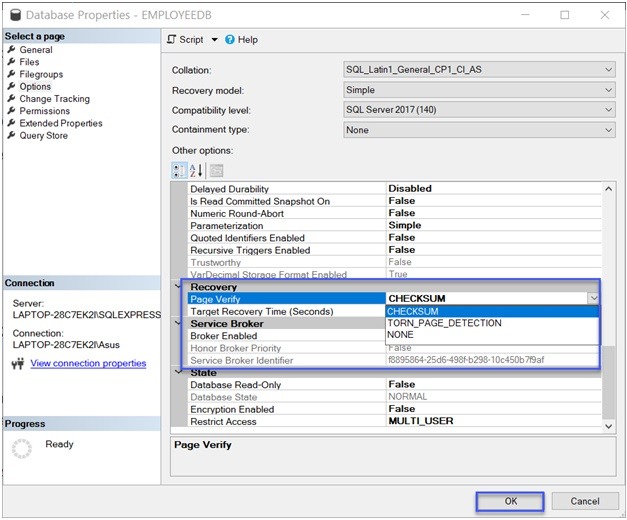
The Page Verify option present in the database properties shows the health of a selected page during each write/read action. It gives a deep control on keeping the information healthy in the database.
- In SQL Server Management Studio, go to the database and choose its properties after right-clicking.
- In the Options category, there is a feature – Recovery. In the Page Verify option – there is a dropdown list where you can see three options – CHECKSUM, TORN_PAGE_DETECTION, and NONE. Set the option to CHECKSUM. Click OK.

The CHECKSUM will check the entire page before it is written to the database.
Method-3. Backup using CHECKSUM.
When you trying to take a complete backup of a database and you use the CHECKSUM feature, then it will make sure that you are saving a healthy database backup available for restoration.
BACKUP DATABASE <Database Name>
TO DISK=disk path’
WITH CHECKSUM;
The backup will create a BAK file consisting of complete database objects in it.
Method-4. Set the alerts.
If the DBA gets an instant notification when corruption is occurring in the database, then it will be faster to recognize the causes and rectify the problem immediately.
- Open the Performance window and click expand the option to open Performance Logs and Alerts.
- Click on the New Alert Settings option after right-clicking on Alerts.
- Provide a name to the alert and click OK.
- Go to the General tab and choose to Add option to add a counter.
- Choose a SQL Server object from the Performance Object list and select a counter from the available list.
- Click Add to select the counter.
- In the Alert dialog box, choose either the Under or Over option for ‘Alert when the value is’ list. It is the limit for the occurrence of alert jobs.
- On the Sample Data Every option, input the sampling frequency.
- Choose the action that will trigger when the alert occurs. Set it into the Action tab.
- On the schedule tab, put the start and stop timings for running the alerts.
Method-5. Recover database using a professional solution.
When the database shows some errors in DBDC CHECKDB and you had not taken a backup of the affected object, then it will be deleted completely. So, the final method to repair and recover all the SQL Database objects will be using a professional SQL Database Repair software that can scan the MDF/NDF files and recover all data.
Conclusion
SQL Server is the backbone where businesses save their professional information related to employees, clients, vendors, inventory, etc. A disruption in the database is bad news for the manager and you cannot afford to lose it. So, use a professional SQL Database software and be ready to overcome any of the corruption or deletion problems in SQL Server.
