Summary: Simple step by step guide to Convert OLM to PST manually, Easily export Outlook for MAC emails to PST format and import the converted PST file to Outlook.
Outlook for Mac is the email application used in the Macintosh system for sending and receiving emails. It is provided by Microsoft and very much similar to MS Outlook for Windows. The only difference is the data file used to store emails and other user information. While MS Outlook for Windows uses PST file Outlook for Mac uses OLM files to store information. So if you want to access Mac emails on the Windows platform you need to export Outlook Mac emails to outlook pst format or convert Outlook for Mac emails to Outlook for Windows PST format.
The other important thing is that you can import the PST file to Outlook for Mac but you can’t import OLM files to Outlook for Windows directly. I don’t understand why Microsoft doesn’t provide such an important feature but don’t worry there are some manual methods that allow OLM files to be imported to Outlook for Windows or we can say to convert olm to pst.
Why there is a need to Convert OLM to PST
Imagine a situation when in your office or at home you were using a Mac system for years and now you switch to a Windows-based system what will you do with your emails then? The answer is simple you need to transfer your emails to Outlook for Windows. In this article, I will let you how to transfer emails from Outlook for Mac to the Windows system (Convert OLM to PST) in detail.
Step 1: Setup IMAP account
The first step is to create an IMAP account I am using Gmail here
- Open Gmail
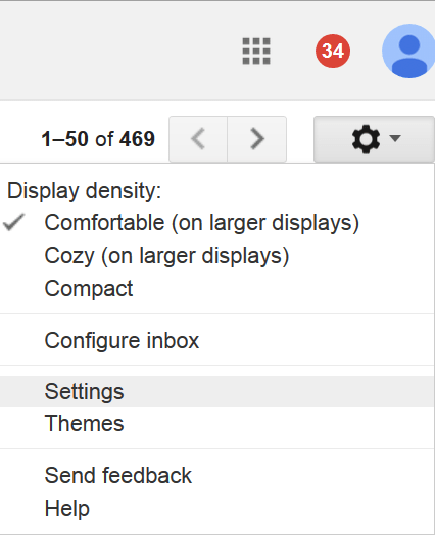
- Click on Gear icon on the right-hand side

- Click Settings
- Click Forwarding and POP/IMAP tab
- Check IMAP Access status, enable IMAP

Step 2: Add IMAP mail account to Outlook for Mac
- Open Outlook for Mac.
- Click Menu >Tools > Accounts.
- Now Click Email.
- Enter the Email address, Password, and other information. Click on Add Account
- The IMAP mail account is now added you can check it in the Mail tab the new account will be listed here.
Step 3: Create a Gmail Label
Now you have to create a label in Gmail
- Open your Gmail account.
- Click on Settings
- Select Labels
- Click on Create New Label. Also, make sure the Show in IMAP box is checked.
- Now to go to your Mac Outlook and click on Send/Receive
It is the main part of this process in which your emails and other mailbox data of an OLM file will be moved or transferred to your IMAP mailbox. Follow the steps shown below:
Step 4: Move emails from Mac Outlook to the IMAP mailbox?
- Open Outlook for Mac
- Right-click on mailbox item which you want to transfer to Outlook for Windows.
- Now Select Move > Copy to Folder.
- Now you need to type the name of your IMAP folder and click on Copy.
- Once the copy is finished you need to update the mailbox by clicking Send/Receive Or you can do the same by refreshing the folder on Gmail.
- Now all the copied mailbox data have been synchronized to the IMAP mailbox folder.
So by following the steps mentioned above carefully one would be able to convert olm to pst for free without taking help from any third party olm to pst converter.
Third-Party Options
If you want to convert olm to pst and don’t have enough time to follow the manual process of converting OLM to PST then you require third-party OLM to PST Converter which will make your task look simpler and within no time you will get PST version of OLM files.
Systools OLM to PST Converter is one of the best software’s to migrate Outlook for Mac emails to Windows Outlook. It is compatible with Outlook 2019, 2016, and 2011 for Mac and also supports MS Outlook 2019, 2016, 2013, 2010, 2007 for windows. Its simple user interface makes it easy to use. Check the steps to convert OLM to PST with Systools software.
Systools OLM to PST Converter
- Download the Convert OLM to PST Tool

- Click on ‘Select Mailbox’ and enter the Outlook for Mac inbox, you can also choose for ‘Find Mailbox’ to locate the folder
- Click on convert to scan the OLM file
- After the complete scan, it will show the preview of files with folders on the left side and the files contained on the right side
- Select which items emails, attachments, contacts you want to convert and proceed next
- Choose the file format as PST, the technician version offers to move files to Office 365, you can select the option to move files to Office 365 mailbox
- Enter the login details and the OLM files will be moved to Office 365
- If you selected the PST option then select to add OLM in new PST file
- Choose the destination path to save PST and Press OK
- The files will be converted to PST
OLM to PST makes the conversion process easy and it also allows us to save OLM files in MSG, EML, RTF, HTML, Office 365, and PDF format also.
