Summary: OST(Offline Storage Table) is an Outlook data files that store all mailbox items like emails, contacts, calendars, notes, journals, tasks, etc. However, sometimes due to an unexpected server crash, a virus attack, or when outlook profile is deleted, we are left with a corrupt or orphaned OST file. To recover your emails from a corrupt or inaccessible OST file, the only option left is to convert the OST to PST. In this blog, we are going to discuss various manual methods to convert OST to PST for free.
What are the best methods to convert OST to PST manually? How can I export OST to PST? Is there a free tool to convert the Outlook OST file to PST? These are the common questions that came in the mind when we OST file that is inaccessible or corrupt. Here we will discuss methods to export OST to PST, and some of the best OST to PST converters available.
Method 1. Convert OST to PST via Import/ Export
As the Outlook OST file synchronizes with Exchange Server, the data that is available on the server is also available in the OST. So, we can log in via Exchange account and export the mailbox to PST. Check the steps
- Step 1: Sign in to Outlook with your Exchange Account
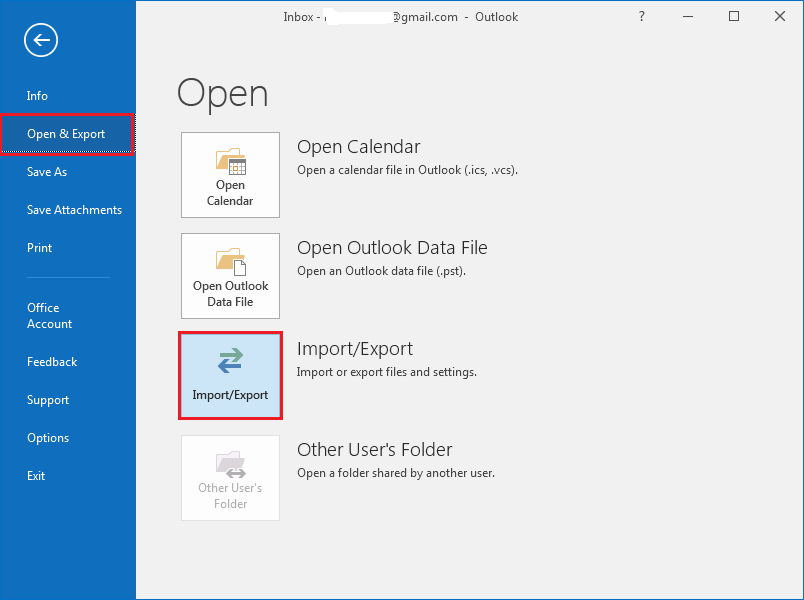
- Step 2: Go to Files, move to Open & Export, and click on the ‘Import/ Export’ button
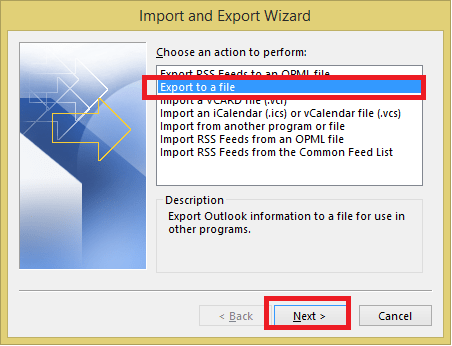
- Step 3: A new window will open, select ‘Export to a File’ and then Next
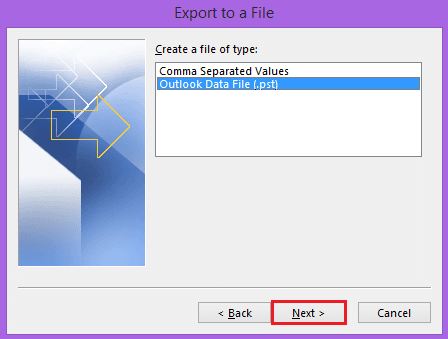
- Step 4: Select the type of file in which OST is to be exported, and choose the ‘Outlook Data File (.PST) option.
- Step 5: It will open the Outlook folders. Now select the folder to export, checkmark include subfolders and click Next
- Step 6: Click on the ‘Browse’ button to select the location to save the PST
- Step 7: Select ‘Do not Export Duplicate items’ and then Finish
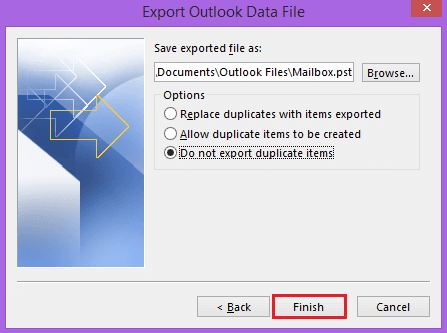
- Step 8: Data from the mailbox will be converted to PST.
So, this is one of the easiest methods to convert OST to PST for free. Try the Archive method if you want to export selected files.
Method 2. Archive Data
This method is useful when you want to carry almost everything, except contacts, with you in a PST. You can email contacts separately. To archive items, perform the steps below if you are using Outlook 2007 or above:
- Step 1: Open Outlook.
- Step 2: Select Folder > AutoArchive Settings
- Step 3: Now select the AutoArchive tab
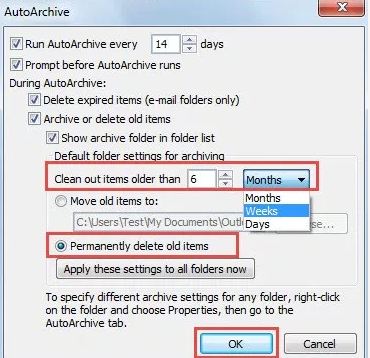
- Step 4: Select Archive this folder using these settings.
- Step 5: In the drop-down, select days and enter a day in the Clear out items older than
- Step 6: Select Move old items to default archive folder
- Step 7: Click the Apply button.
All items will be moved into the Archive folder
Create a New PST And Move Data In That
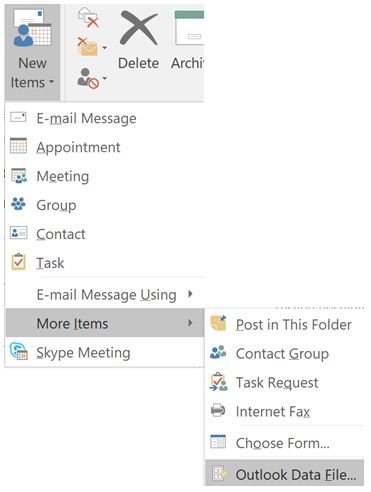
The second option is to create a new PST from File > Account Settings > Account Settings > New. Note the path of the New PST file.
Once the PST is created, select all the data that you want to carry with you and drag it into the new PST file. Once you have moved all data to the new PST file, copy it from the location where you created it.
Method 3. Send via Email
Another possible option is a bit tedious and time-consuming, but you may want to use this method in case the items to be transferred are few. You can forward/email the important emails, contacts, etc to your personal email ID from your official email ID. However, ensure that your company policy allows the same.
If there are many items, then right-click each item and save it in Outlook format. Once all items are saved, zip all of them and then forward that zip file as an attachment.
And, if you want to carry the calendar entries, you can use the Forward Calendar feature in Outlook 2007 or 2010.
While you want to carry your data with you when leaving the organization, it is a must to ensure that your company allows the same. A wrong action may lead to a problem.
Note: Do not delete the Exchange profile
Until you have opened the existing OST file and saved its content in PST format, do not delete the current Exchange profile. Once the profile is deleted, you will not be able to fetch data from the OST file, and then you will be left with one of the two solutions:
- Restore Exchange Account: This method may be helpful only when your system has a restore point; otherwise not.
- Use Third-Party Convert OST to PST Tool: It helps you to convert OST to PST and get access to the data stored in the OST file.
How to Restore an Exchange Account
In order to restore the deleted Exchange account, you need to look for the restore point and restore your system to that point. Perform the steps to restore the Exchange account:
- Click Start Menu > Programs > Accessories > System tools, or you can also enter %systemroot%\system32\rstrui.exe in the Start search box.
- Once the Restore window opens, select an earlier date. Do not select the date on which you have deleted the profile.
- Continue the restoration process. This process takes some time, so keep patience.
After completing the steps mentioned above, the account will be restored, and then you can open the OST file and save it in a PST using one of the methods listed above.
Third-Party OST to PST Converter
Microsoft has now discontinued the OST2PST.exe tool, so you are left with the option to use a third-party Convert OST to PST application if you have deleted the Exchange Account and are not able to restore it, or you have already left the firm you were working with. Here is the list of a few Best OST to PST Converters to convert ost to PST. Choose the one you like. Personally, I suggest you use the Stellar OST to PST Conversion application, which performs safe and easy conversion of orphaned OST files to usable PST format,t which is easily importable to MS Outlook.
How to Use Stellar OST to PST Converter
In order to convert OST to PST files, you can use Stellar Converter for OST to migrate data from OST to PST, which can be imported to Outlook. The steps for OST to PST Conversion are as follows:
Download the Stellar OST to PST Tool from here
- Start the OST to PST converter tool by double-clicking the software icon or by using Right Click>Run
- Click on the File tab, and it will prompt you to add the OST file
- Click on Select OST file to search for an OST file and then add it
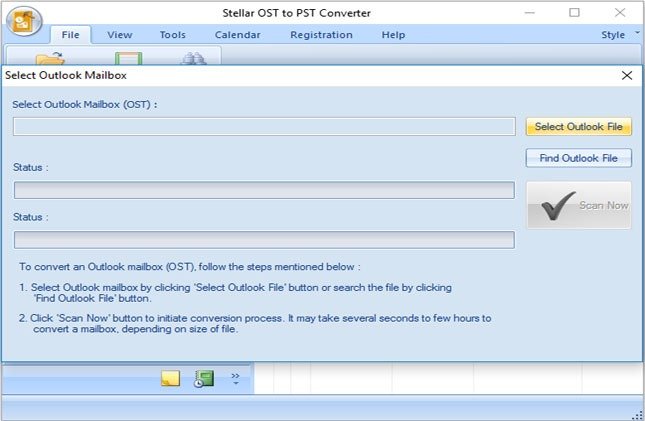
- Now click on the ‘Convert’ button
- The OST to PST will scan and preview the items
- Check the items and browse through folders to select which items you want to convert
- Once the selection is done, click on the ‘Save Converted File’ button in the menu bar
- Select the option ‘PST’ and click on the ‘Browse’ button
- Choose the location to save the converted PST file
- The converted Outlook PST file will be saved at the selected location
So, in simple steps, you can convert the OST to PST. Moreover, the OST to PST converter comes with the option to save the scan information as a .DAT file and then load it for conversion. The software allows us to save the OST to MSG, EML, RTF, HTML, and PDF formats too. Install the OST to PST converter and export your files in minutes.